• Contact Us
  • Select a Location
    Close Location Selection

    Current Location:

    Let us know the location you'd like to browse.

    Select a Location
    OR

Managing Contacts in the Security Solutions Subscriber Portal

Solution

There are three different types of contacts with a variety functions within your detection system. Use the table below to understand the types of contacts available and their responsibilities.

TypeResponsibilitiesNotes
Emergency Dispatch Contacts
  • The Central Monitoring Station (CMS) calls these individuals before the police are notified of an active alarm event.
  • Your contact person must provide the Secret Word (Central Station Passcode) to cancel an active alarm.
  • You may edit or change the contact names at any time, but local Alarm Ordinances require two valid emergency contacts at all times.
  • Always make sure your contact list is up-to-date with the correct contact name and contact phone number and make sure these individuals know your Secret Word.
  • CMS calls the person via phone only; text or email is not available.
Additional Responding Contacts
  • Up to two additional persons can be provided as responding contacts in the event of an active alarm event.
  • These individuals will be notified by CMS after police are dispatched to an active alarm event.
  • These contacts are optional and can be added, edited, or removed at any time.
  • Always make sure to keep your contact list up-to-date with the correct contact name and contact phone number and make sure these individuals know your Secret Word.
  • CMS calls the person via phone only; text or email is not available.
Rule Notification Contacts

Individuals who are notified via email or text when the rule criteria you have specified are met.

The notifications sent to these contacts are different from your emergency dispatch notifications, and false alarms cannot be canceled by responding to these notifications.


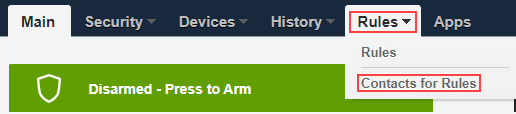
Follow the steps below to manage your contacts in the detection subscriber portal.

1

Sign in to the detection subscriber portal.

2

Select the Rules drop-down and click Contacts for Rules.

Image of Rules Menu

3

From the Contacts window, you can add, edit, or delete codes. See the process in the table below for each.

If...Then...
Add new contact
  1. Click Add Contact.

    Image of Add Contact

  2. Enter the contact information in the Add Contact window.
  3. Click SAVE.
Edit existing contact
  1. Click the Pencil icon for the contact you wish to edit.

    Image of Add Contact

  2. Complete the edits to the contact information.
  3. Click SAVE.
Delete existing contact
  1. Click the Delete icon for the contact you wish to edit.

    Image of Add Contact

  2. On the Confirm Contact Delete window, click Yes.

    Notes:
    • Contacts cannot be deleted if they are defined in a rule.
    • The person associated with the account is automatically added as a contact. This contact cannot be deleted from the list of contacts.
New MyAccount

Cox Business MyAccount Updates

With the new and improved MyAccount portal from Cox Business, you’re in control. Included with your Cox Business services, it’s all right at your fingertips anytime, anywhere. 


  • Perform a health check on your services and reset your equipment
  • Easily configure key features and settings like voicemail and call forwarding
  • View your balance and schedule payments

Search Cox Business Support

Didn't Find What You Were Looking For? Search Here.