Add Security Users through MyAccount.
Creating a Group Login for Multi-System Security Dashboard Using MyAccount
Share or Print This Article
Solution
1
2
From the Security page, click the Launch portal button.
3
Click Users.
4
In the upper right-hand corner, click Manage Logins.
5
Select the user ID to add to the group logins
6
From the Select Login roles and Permissions screen, select their login role and permissions based on the desired access. The following table provides information about the available roles.
| Role | Description |
|---|---|
| Administrator | Provides full access to manage the locations within the groups you grant access to. |
| Full Control | Provides the ability to control and manage all devices and use most of the Customer Website and mobile app functionality available to the primary account login for each location in the Enterprise Group.
|
| Read Only | Provides the ability to see most of the Customer Website pages and settings for each of the locations in the Enterprise Group, but will not be able to make any changes to account settings, arming state, or device status, and cannot view saved video. These logins cannot manage Customer Website logins. |
| Custom | Create a Custom role to fit your exact requirements for this login. Use the checkboxes below to include a specific type of permission, and then decide what level of control to provide the login:
|
7
View the table below for steps on selecting the appropriate ACCESS TYPE for the user.
| Access Type | Description | Steps |
|---|---|---|
| At All Times | Access with no restrictions |
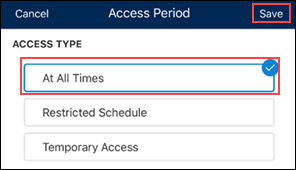 |
| Restricted Schedule | Access with days and times |
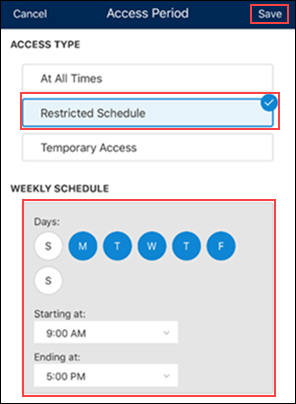 |
| Temporary Access | Access for a limited time |
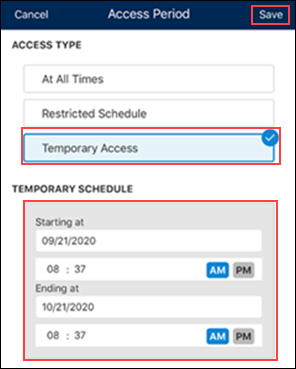 |
8
In the Access Type field, select the desired type of access for the user.
- Existing + Future: Grants access to all devices in all locations across all groups and automatically grants access to future devices, locations, and groups.
- All Existing Devices: Grants the user access to all currently existing devices, locations, and groups.
- Set By Location: Allows you to select the desired access based on location.
- No Device Access: Restricts access to all devices on all locations within any group.
9
Click Save.
The user code is sent to the panels at the selected locations to allow the user access.
- Wait 5 minutes before testing the code at the panel.
- The duration that it takes to push codes to the panel depends on the number of locations that need to be updated.
Do not make changes to the panel or send other remote commands during this time as this could result in codes not syncing properly.

Cox Business MyAccount Updates
Cox Business MyAccount Updates
With the new and improved MyAccount portal from Cox Business, you’re in control. Included with your Cox Business services, it’s all right at your fingertips anytime, anywhere.
- Perform a health check on your services and reset your equipment
- Easily configure key features and settings like voicemail and call forwarding
- View your balance and schedule payments
Search Cox Business Support
Search Cox Business Support
Didn't Find What You Were Looking For? Search Here.