• Contact Us
  • Select a Location
    Close Location Selection

    Current Location:

    Let us know the location you'd like to browse.

    Select a Location
    OR

Changing Email Server Settings for Windows Mail

Solution

Use the following steps to update Windows Mail to secure port settings for sending your Cox Email.


For more help using Windows Mail, visit Microsoft support.

1

To launch Mail, click on the Windows icon windows icon, enter Mail, then click on the Mail app image of the mail app icon.

2

From the Inbox window, click Settings image of the settings symbol.

3

From the Settings window, click Manage Accounts.

4

From the Accounts window, click your Cox Email account.

5

Click Change mailbox sync settings.

image of clicking change mailbox sync settings

6

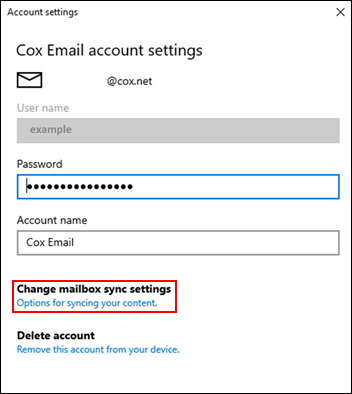
Scroll down, then click Advanced mailbox settings.

image of clicking advanced mailbox settings

7

Update the following outgoing mail settings.
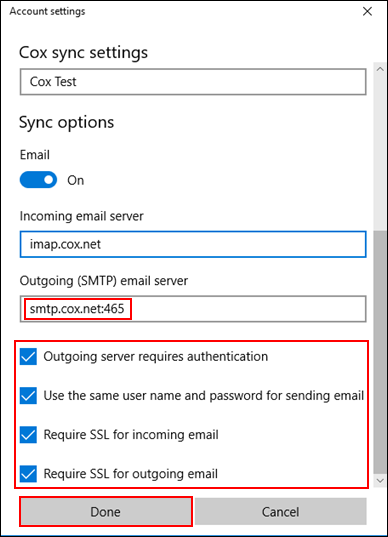
  1. In the Outgoing (SMTP) email server field, enter smtp.cox.net:465.
  2. Place a check in the Outgoing server requires authentication box.
  3. Place a check in the Use the same user name and password for sending email box.
  4. Place a check in the Require SSL for outgoing email box.
  5. Click Done.

image of fields to update highlighted

8

Click Save.

Notes:

  • If Cox Email will not send after updating the outgoing server settings, then reset your password at www.cox.com/password and update the password in your email client and all related applications.
  • Cox recommends using the latest software version of third-party email clients. If your email client is an older version, we recommend you update the software to the latest version to ensure the most secure experience. If you need assistance updating your email client, then contact the manufacturer.
  • To validate all other settings, refer to Email Server Settings.

Search for More Articles